
More than a century since its inception, Montessori is now more popular than ever and rapidly extending from the classroom to the homes of a growing number of families. Many first learn of the Montessori approach because of the highly commercialized “Montessori bed”, which has been slowly making its way into mainstream design. But while this type of bed is a key aspect of a Montessori-inspired bedroom, there is a lot more to consider when designing this type of space for your child.
In short, a Montessori-inspired bedroom is a bedroom that is designed according to Montessori principles. These include accessibility, functionality, order, beauty and simplicity. It is essentially a bedroom designed with the child’s needs and abilities in mind. You will typically see child-sized furniture to foster independence and provide the child with the freedom to move and explore his surroundings; as well as natural and simple features. These help promote a sense of order, structure and beauty, helping to prevent distractions and overwhelm.
Now let’s look at the different areas you may see in a Montessori-inspired bedroom:
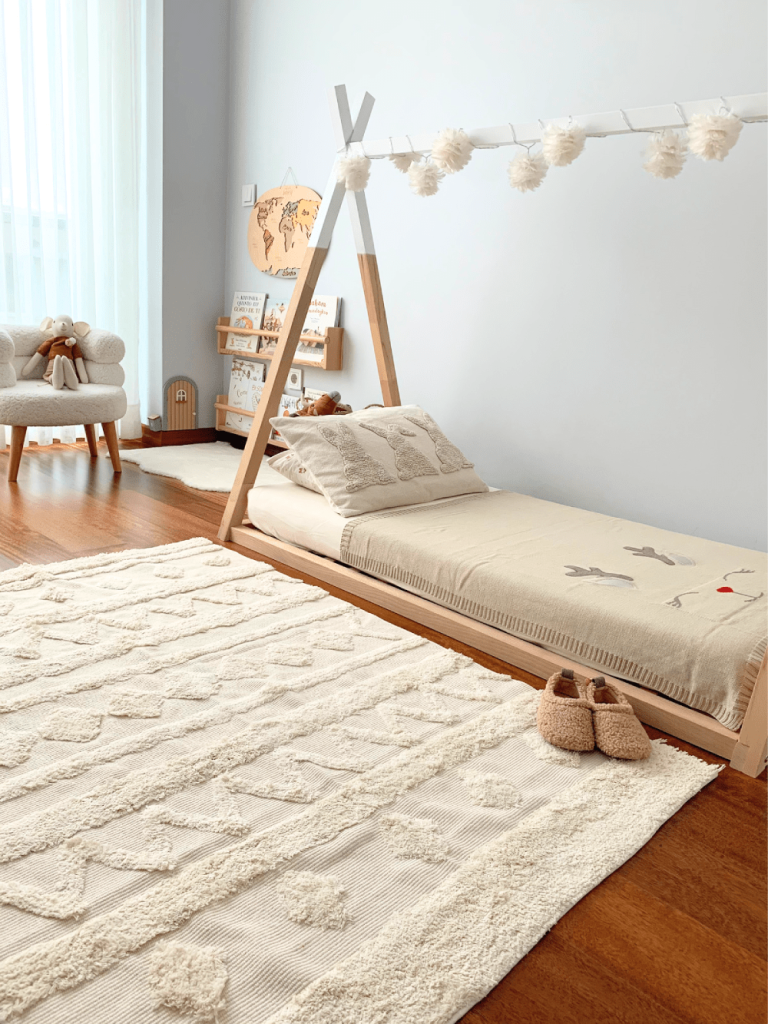
The focal point of a Montessori bedroom is, of course, the “Montessori bed”. While in recent years beds in the shape of a house or tent have been widely marketed as “Montessori beds”, in reality a “Montessori bed”is simply a bed that is accessible to the child.
Maria Montessori believed that children thrive when given the freedom to move and learn independently. Therefore, a “Montessori bed” is simply a bed without restrictive railing; a bed that the child can climb in and out of on their own without needing assistance from an adult. This is the key difference between a traditional and a Montessori bedroom.
Traditional vs. Montessori approach
In a traditional bedroom, the crib restricts the child’s movement and vision, preventing them from exploring freely. The child then learns that upon waking up they need to cry to alert an adult to come and get them.
By contrast, in a Montessori-inspired bedroom the child can signal to the adult that they are awake without the need to cry, and can even begin to explore independently. It provides freedom of choice, promotes independence and encourages decision-making. The child gets to choose what to gravitate toward upon waking up; their reading area, their shelf activities, or any other area that peaks their interest.
Now that we’ve discussed the benefits of a “Montessori bed”, you’re probably wondering: Is it safe? And when should I make the transition?
The answer to the first question is yes, as long as extra safety measures are taken. Before introducing a floor bed be sure to completely child-proof the room by covering electrical outlets, installing locks on windows if needed, anchoring furniture to the wall and removing any loose parts or objects that may represent a choking hazard or cause harm to your child.
As for the second question, please know that every child and every family is different, so there is no right answer. Do what feels right for you. Some families transition right after the bassinet, others much later.
We transitioned when my daughter was 13 months old. That’s when the conditions aligned for us and it really was a game changer. It opened up the room and a whole new world of possibility where my daughter could be more of herself. She has been using her bed throughout the day since, to read books and play with her stuffed animals. Imagine being a child and having access to your safe space anytime you want.
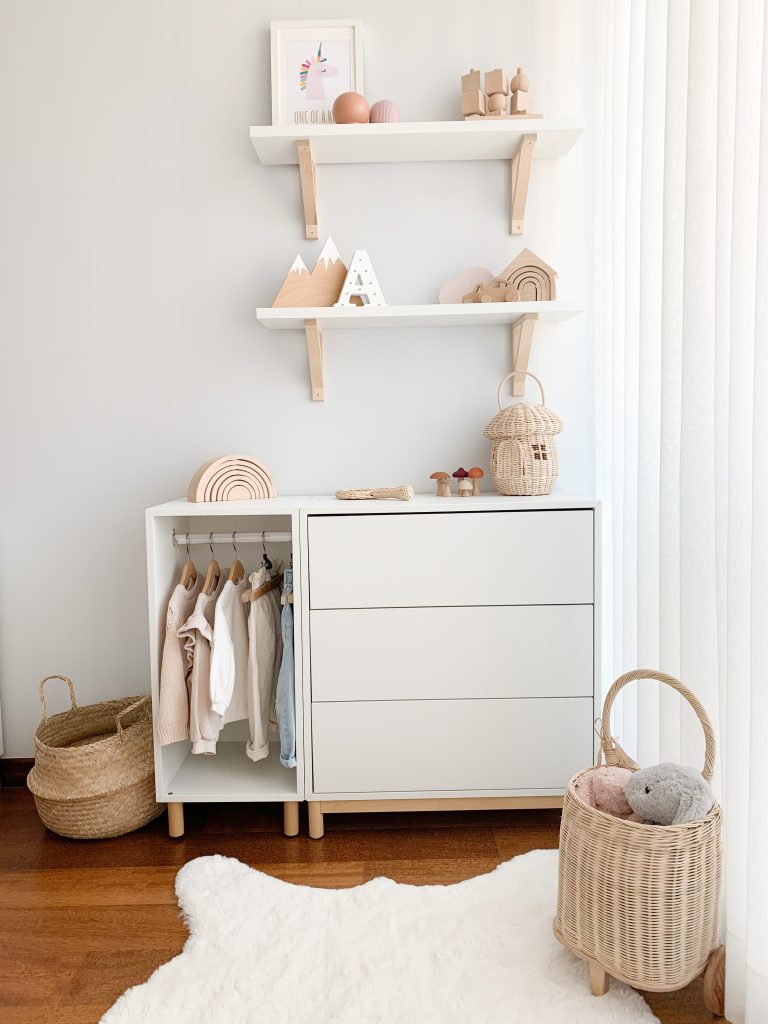
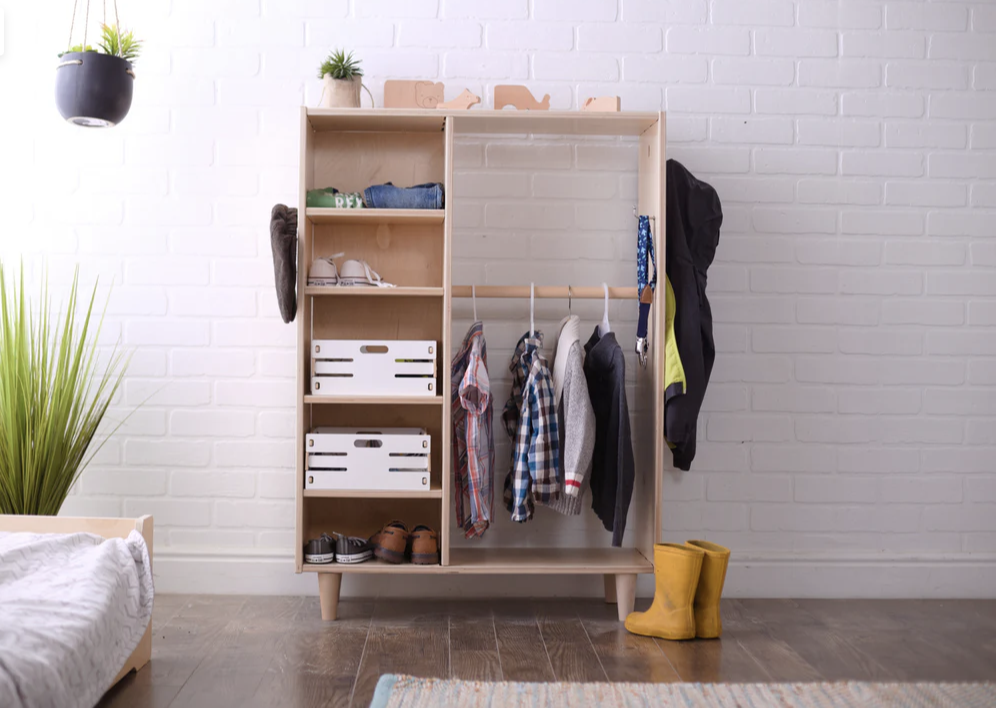
A second key element in a Montessori-inspired bedroom is an accessible dressing area. This area should help foster independence and build confidence; offer choices and provide opportunities for your child to practice new skills.
Ideally you would have a toddler closet. We love the Alba Montessori Children’s Wardrobe by Sprout Kids because it’s just the right size, very easy to organize and can even grow with your child.
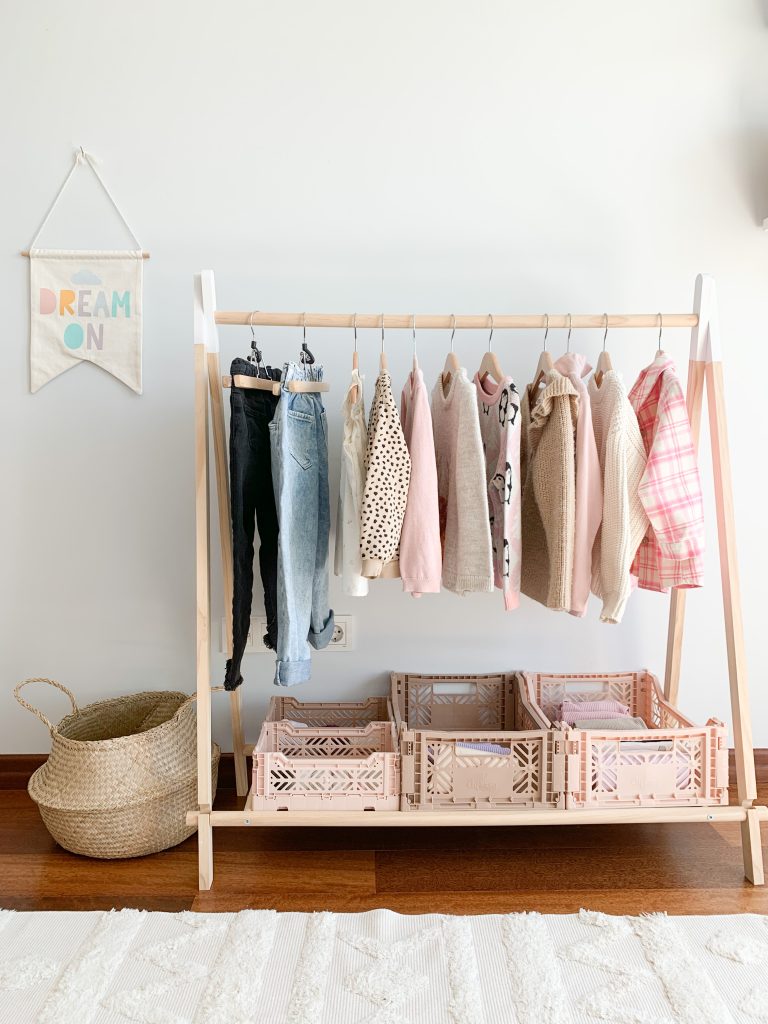
If you don’t have a toddler wardrobe, there are many ways you can still offer choices and make clothes accessible to your little one. You could start by hanging two choices on the closet door to start. Another popular option is hanging them on a low shelf. As a more permanent option, a small accessible wardrobe with shelves, drawers or a small hanging space – or a combination of all three – is ideal. However, if that is not an option at the moment due to space or budget restrictions, you can start with baskets on the floor or by hanging a few options on low hooks or the main wardrobe door.

Alternatively, simply add a rack at their level in the existing closet so your child can reach the clothing. Do what you can with what you already have in your home and get as creative as you need to be. The main thing is that you start providing the child with limited options and encourage independence through decision-making. Leave only appropriate options within reach and store out-of-season items elsewhere to avoid potential power struggles.
Another popular hack consists of adapting the IKEA Kallax unit to function as a toddler wardrobe. For this, you will need a 12-18″ curtain rod, baskets or Kallax drawers, and kids clothes’ hangers. On the right side, take out the existing shelf and install the rod to create a space for hanging clothes. Add the baskets or drawers to the shelves on the right side for smaller items of clothing. You can also add a mirror directly on the side of the unit and/or a stool with a few self-care items.
Start offering your child a choice between two clothing items as early as 12 months (or even earlier) and gradually increase that number to 3, 4 or 5 as the child gets older.
We created a DIY wardrobe using the IKEA Eket series at 2 years old. The drawers are push hinges and very toddler-friendly. Inside the drawers, I used small dividers to make compartments for t-shirts, bottoms, socks and other seasonal items. For the section with hangers, we purchased the Eket cabinet with door, removed the shelf in the middle and added a rod for hangers. There is a laundry basket next to it for dirty clothes and a chair nearby to help with dressing.
Zara Home wardrobe for a 4-year old. Four containers at the bottom with 1) underwear, 2) socks, 3) bottoms and 4 ) tops (t-shirts). Next to it is a laundry bin and chair (not pictured) to help with dressing.
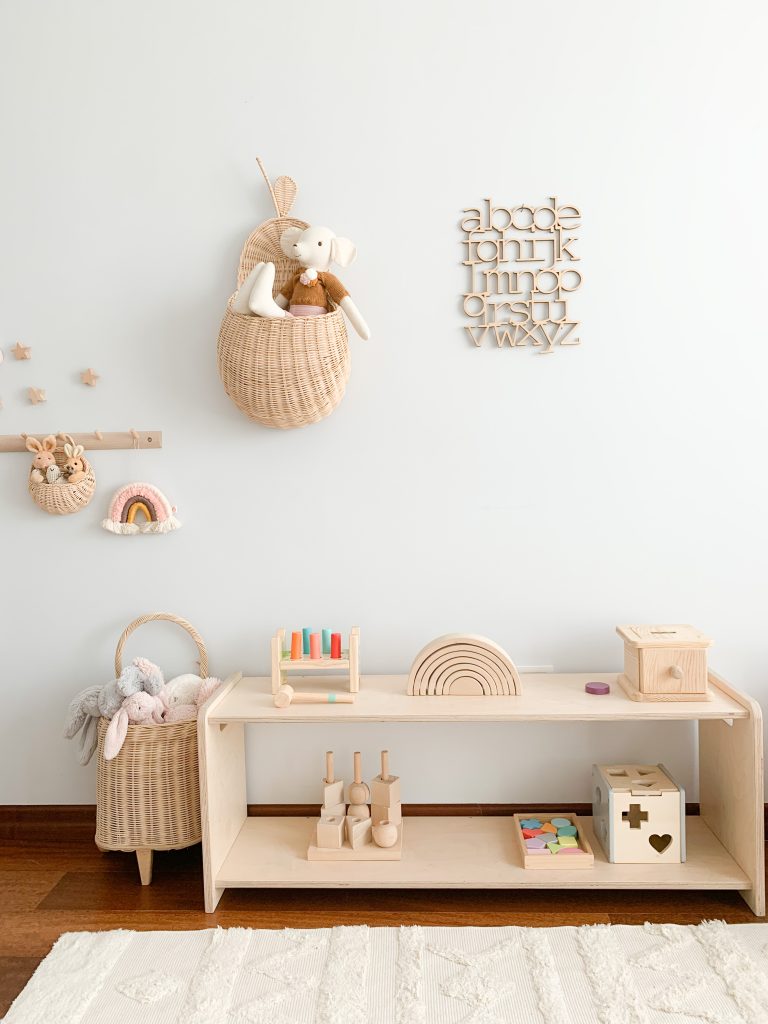
If space allows, you can consider a small shelf (or baskets) with activities that your child can play quietly with upon waking up. A soft rug near or in front of the shelf helps to create a soothing atmosphere and allows the child to play and move freely. I like to keep activities/toys in the bedroom simple and not overly stimulating, opting for passive toys and avoiding toys that feature loud sounds and/or flashing lights.
For a younger toddler, choose materials that are interesting to explore and manipulate, and support the child in developing the skills they’re working on at that moment. At this stage they are likely working on developing fine and gross motor skills, hand-eye coordination, spatial awareness, cognitive skills and concentration.
A few Montessori sensorial materials you can consider include: a three-piece circle puzzle, a three-shape puzzle, the object permanence box, the Imbucare box, rings on a vertical dowel, rings on a horizontal dowel, colored rings on dowels, and a shape sorter. At 18 months your toddler might also enjoy a hammer bench type of toy, more difficult puzzles, object-to-picture matching using miniature figurines and nesting cubes.

For an older child (3+), pretend play items such as dolls, a baby stroller, wooden blocks, animal figurines, stacking toys such as a rainbow and other open-ended items of the sort – as opposed to more Montessori-aligned close-ended activities – might be a better fit, depending on the child. Follow your particular child’s interests and developmental needs. This becomes easier if you adopt an observation practice. Take a few minutes every few days to observe your child objectively, without judgement and without interrupting. This will help you gain insights into their capabilities, interests, developmental progress and more.
And just as importantly, it can help you figure out how you can best support them and continuously adapt the environment to meet their individual needs. To keep the child engaged, rotate toys, activities and books based on the their interests and developmental needs. Toy rotations offer a number of benefits to both the parent and the child.
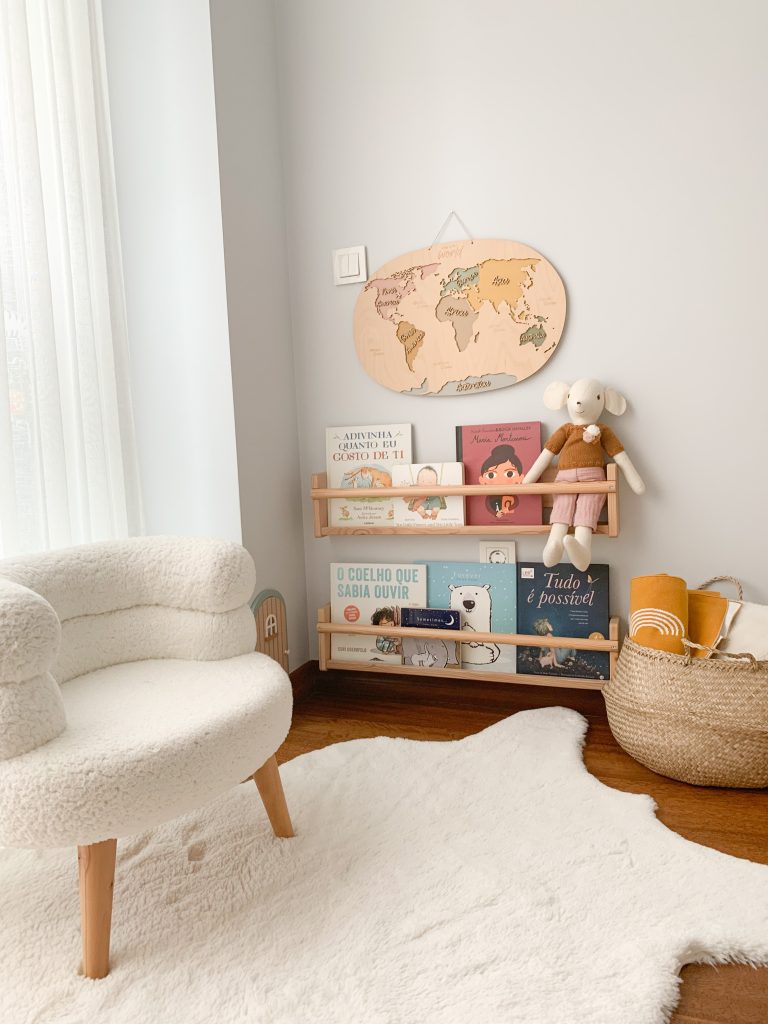
A simple reading area in your child’s bedroom is a great way to build reading routines and raise book lovers.
Forward-facing bookshelves work best for younger children and allow you to display books with the covers facing forward, making the books more appealing and enticing.
If you opt for a wall-mounted shelf be sure to install it low enough that the child can easily reach. They should be able to pick up books and put them back on their own. Keeping the bookshelves a neutral color (i.e. white or light wood), instead of a bright color, allows the books themselves to stand out. If a bookshelf is outside of your budget, you can opt for a basket on the floor with books in a line (so that the front cover of the first one is visible).
You can make the area cozier by adding seating. A bean bag, play mattress, floor pillow or lounger are all great options but a cozy carpet with pillows works just as well. Alternatively, simply place the shelves or baskets near the floor bed so the child can get cozy and read in bed.
Be sure to include a few of your child’s favorite books. Having a few of their stuffed toys nearby or small items that can be used for bookish play is another way to bring books to life.
Display only a limited number of books and rotate them every once in a while. This helps keep the reading area engaging for the child. If interest starts to wane, it may be time to refresh the space once again.
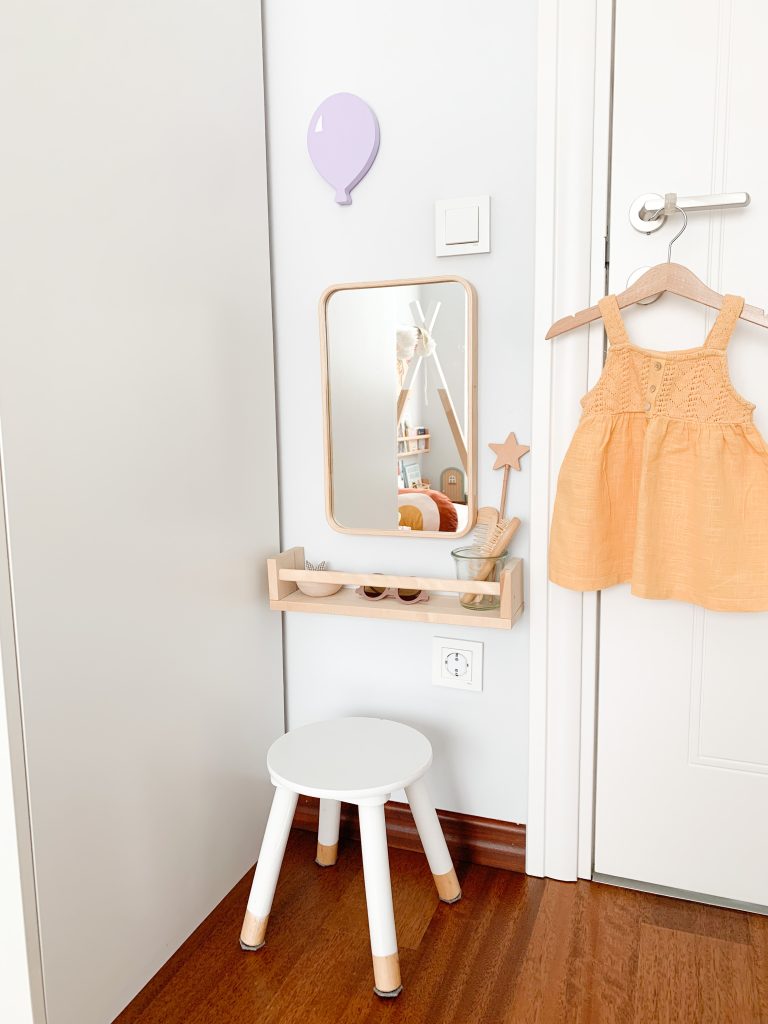
If your child performs self-care activities, such as brushing their hair, wiping their face or applying cream, in the bedroom, you may also want to consider having a simple self-care station. This is a great way to encourage independence, improve body awareness and help them learn how to dress and groom themselves. Plus, it can also help make routines easier. This area should include a mirror and a small shelf or basket with the self-care items the child needs. Ours also includes a stool.
Having a designated area for these activities promotes order and organization in the environment (the child knows where these actions are performed and where the items are stored) and encourages the child to practice new skills. For some families these self-care activities may be done in the bathroom or elsewhere in the house. If that is your case, do what works best for your family.
Once you’re done setting up your child’s bedroom, get down on the floor so you can view the space from their perspective.
Ask yourself these questions:
Is the room child-proof and safe?
Is everything my child needs within reach?
Your answer to both of these questions should be yes. Let the the room evolve with the child as they reach new milestones and master new skills.
I hope this article has inspired you to create an accessible and child-centered bedroom for your little one(s). When we design our children’s bedrooms with their needs and capabilities in mind we are not only conveying our love and respect for them but also empowering them. They trust their capabilities because we trust them first. And that’s a solid foundation for any growing, learning, little human.
COPYRIGHT © 2023 WONDERHOUSE OF LITTLES LLC. ALL RIGHTS RESERVED
Leave a Reply